Thursday 30 January 2014

Winter Warming Pea & Mint Soup with Crispy Pancetta or Parma Ham - Recipe

I cannot begin to tell you how delicious this soup is, this is absolutely one of my favourites. When I have served this up to guests some have been shocked by the vivid green colour but I've always had compliments about just how nice it tastes. I think the combination of the tasty peas, fresh mint and salty and crispy pancetta or parma ham really brings this soup to life. Better still it's incredibly easy to make, it's quite a rough recipe as I tend to judge by eye and taste when I make it so please don't be scared to experiment with the quantities.


Recipe

Ingredients

350g frozen peas (approximately depending on the amount of soup you are making)
A bunch of spring onions or 1 medium sized onion
A bunch of fresh mint
Chicken or veg stock (use your judgement as to how much you need depending on how thick or think you prefer the soup)
Salt & pepper to season
Double cream (as much or as little as you prefer)
Pancetta or parma ham cooked until crispy
Crusty bread

Method

1. Add a knob of butter to a large pan. Chop the onion and a handful of fresh mint into small pieces, heat the butter and add the onions to this. Sweat the onions off and add the peas and mint, stir for a few minutes until they are coated in the butter and softened a little bit.


2. Add about 1 pint of chicken or vegetable stock at this point (you can always add more later if necessary) and bring to a simmer. Season and taste at this point. Let it simmer for around 5 minutes occasionally stirring and keeping an eye on it. 

3. Once simmered add a generous dash of double cream, I probably add about 4-5 tablespoons but it's done to taste. Once you've added the cream blend the soup with a hand blender or similar, you can either make it really smooth or a bit coarse which is how I prefer it. Once blended if you think it's too thin add a few more peas and allow them to cook and re-blend, like wise if it's too thick just add a bit more stock or cream. 

4. Check the seasoning and put the soup to one side while you prepare the croutons and ham. 

5. *This bit is optional but I think it makes the soup* Roughly tear some crusty bread, drizzle with some extra virgin olive oil if you like and put in a hot oven for about 5 minutes. After the 5 minutes is up add the pancetta or parma ham and some torn bits of fresh mint leaves and put back into the hot oven until crispy. 

6. Warm the soup back up and serve with the crispy croutons, ham and some crusty bread on the side. Perfection.


post signature

Wednesday 29 January 2014

Guest Post - Cheer up your Home with Spring Flowers

I absolutely love having fresh, colourful flowers in the house, I really do think it's good for the soul and cheers the place up on a dull and dreary day. In this post, Kelly from the Great British Florist company talks us through some beautiful flower choices to help with just that.

Cheer up your Home with Spring Flowers

I’m fairly confident in assuming that I’m not the only one who’s well and truly bored of winter now…..am I right? Although I’m not really gonna complain too much, I think we've had it pretty darn good so far, I haven’t had to don my snow boots once at all. I am however, dying to get some windows open (yes I’m very guilty of leaving them locked shut when it’s cold out), get some washing on the line, and do a spot of spring cleaning, then fill my home with some lovely spring flowers….ahhh it’s the simple things.

Here are a few ideas on how to brighten up your home this spring.

Tulips


I’ll start with my all-time lovelies- Tulips. What I love most about them is that there are so many colours and shades to choose from, quite literally, hundreds. We all know of the ultra-trendy Ombre theme right? Well, this year I’ll definitely be trying it with my flowers at home. Maybe buying them in about three or four different shades of pink or purple and a white, then simply arranging them from dark to light for something a little bit different. To get maximum impact, I’d say keep the stems fairly short and of the same height and arrange in a long, rectangular style vase so you can really see the effect. Fabulous!


Cheery Daffodils

I still remember wayyy back in the day; as soon as the daffodils bloomed I’d go right out and pick them for my Mum. She’d pop them in a jar (sometimes a milk bottle) and sit them on the kitchen windowsill. How lovely! If you have quite a thick bunch, they look beautiful squashed together, in a short, clear vase as a centre piece. Or, because of their long, sturdy stems look fab singularly in a tall thin vase. Place 3 together and you have a cute little arrangement. The great thing about daffs is that they really are quite inexpensive, so you have no excuses for your home to be anything but cheery this spring.


Something a bit Vintage

Now, everywhere I go, vintage seems to be THE thing. From clothing and accessories, to hairstyles and furniture, so why not your flowers? How fetching would a bunch of wild, handpicked flowers look in a pretty painted jug? I know they’re very popular at weddings right now and would look equally as gorgeous in your home. I’m thinking wild poppies, daisies, bluebell, meadow buttercups (which are the larger ones) and blue cornflower which have the most amazingly striking blue/purple hue. Add some greenery from the garden and you have a unique and wonderful display of vintage looking blooms.


This article was written by Kelly of the Great British Florist, nationwide floristry specialising in British Flowers that smell wonderful and look gorgeous!
post signature

Tuesday 28 January 2014

Bare Minerals Bright & Beautiful Collection - Review

I have recently become a Bare Minerals convert, how I haven't used any of there products before I do not know (slap on the wrist, bad beauty blogger!). 

Here is the deal.......

I was originally looking for a decent eyeshadow brush earlier this month, not really sure why I'd just decided that I needed a new brush and randomly ended up at the Bare Minerals counter in my local Debenhams perusing the items on offer. 

The lovely sales lady asks if I need any help, I tell her I'm after a new eyeshadow brush, she then proceeds to show me their selection, the one I like is £24.00, yes £24.00 for a brush. Lovely sales lady could see that I wasn't about to part with that sort of money just for a brush and then wafts this beautiful box of loveliness in front of my eyes which contains 8 items from the Bare Minerals range including said brush all for the magical price of £29.00. Yes you read that right, £29.00, within the space of 30 seconds I was sold, especially when I was told what was included in the box. 


http://www.bareminerals.co.uk/

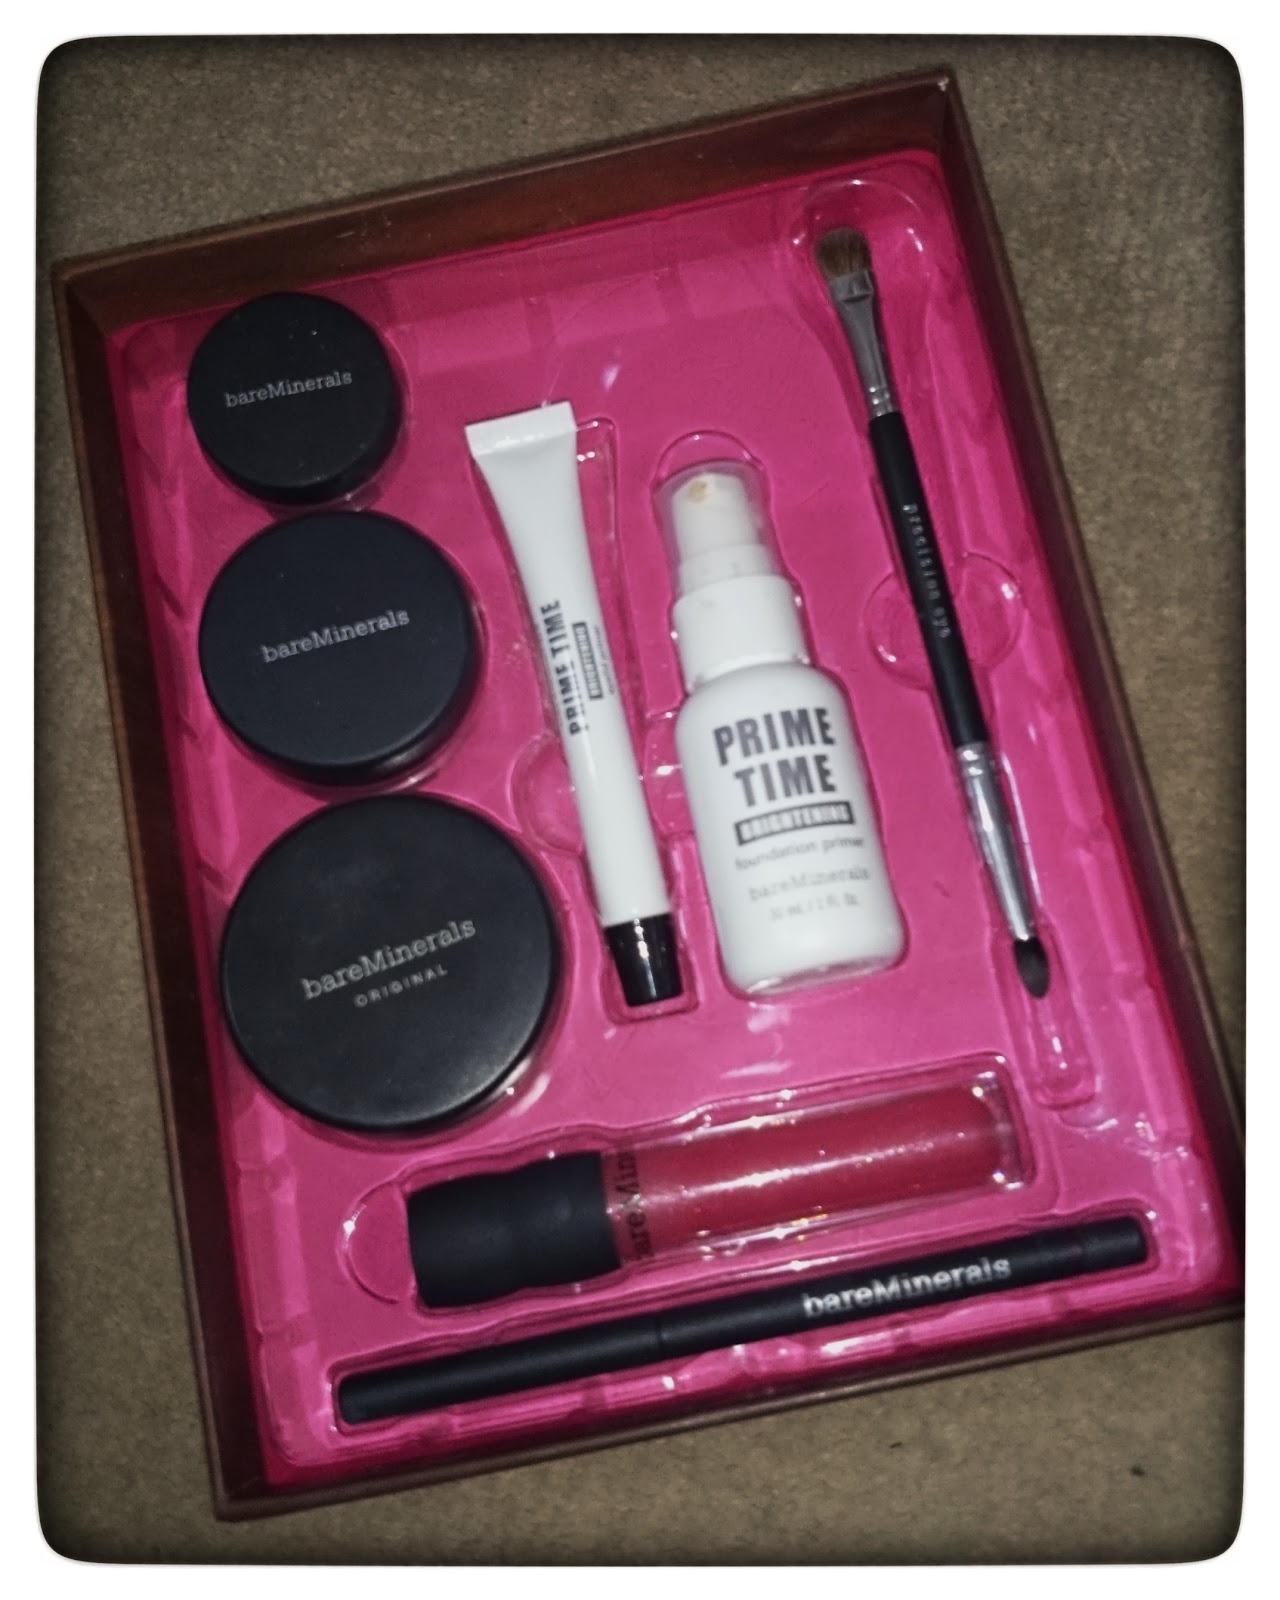
What I returned home with was the Bright & Beautiful Collection (for some reason is now £32.01 comes with face brush as opposed to eyeshadow brush but is still a bargain). This box of loveliness contains 8 key items to brighten and illuminate your face and is fabulous!! I will go through what is included below but then I will talk you through the best way to apply the foundation as it takes a bit of practice as I've found!


http://www.bareminerals.co.uk/
What is included? 

Eyecolour 0.57 g in Alive (£14.00 sold separately): This is a gorgeous shimmery, purple shade which applies so smoothly, it can be applied dry or wet for a more dramatic effect. 


Blush 0.85g in Vivacious (£19.00 sold separately): This is a lovely raspberry shade and works with all skin tones, I have found that it very subtle and adds a beautiful whisper of colour when applied, I quite often opt for bronzer over blusher but I find this adds just a nice amount of colour to my cheeks. 


Prime Time Brightening Eyelid Primer (£16.00 sold separately): I don't normally use a primer under my eyeshadow but this is gorgeous as it adds a luminous sheen (as you can see in the picture below) as well as a smooth base to apply the eye make up over. I've found it really helps keep my eyeshadow stay put while adding another dimension to the colour chosen. I like the fact it can also be worn alone for a minimal, barely there look. 


Double Ended Precision Eye Brush (£24.00 sold separately): This is a soft, versatile eyeshadow brush that applies mineral make up beautifully, the pointed end can be used to highlight and line while the tapered end can be used for applying the colour to the eyelid. 

Natural Lipgloss in Lollipop ((£14.00 sold separately): I love the packaging to this gorgeous, pink shimmery lip gloss. It's a sheer gloss with a slight shimmer running through, it's perfect for every day use or if you just want a slight pop of colour on your lips. 

Big & Bright Eyeliner in Plum (£13.00 sold separately): This is a really nice double ended, creamy eyeliner in a rich plum colour. Conveniently this eye pencil has a in built sharpener and a smudger on the other end which is always useful!


Finally the foundation primer and foundation itself. 


Prime Time Brightening Foundation Primer 30ml (£21.00 sold separately): So this is a brightening primer that adds a base for the foundation but also adds a luminous, healthy glow to your skin tone and reduces the look of pores. 1 pump is all that is required and then it should be smoothed over the face prior to applying the foundation. It feels so silky when you apply it and makes the technique of applying the foundation very simple.

Original SPF 15 Foundation with Click, Lock, Go Softer 8g (£25.00 sold separately): This foundation took me by surprise if I'm honest. Initially I was dubious, it comes in a powder form and I couldn't quite understand how to apply it.  I watched a couple of videos which you can access via the link above and I also visited my local Bare Minerals counter where they explained exactly the method required to apply the foundation. The trick is to dispense some product into the lid and apply using the swirl, tap and buff method. You swirl a soft brush into the powder and tap the excess off ensuring that no powder is visible on the brush (it gets tucked into the bristles), you then buff the foundation onto your face starting from the outer edge in. It should leave a glowy, porcelain finish. It's a lovely foundation and it feels barely there when worn but with a really nice coverage. 


I am now a complete convert to Bare Minerals, I've been really impressed with all the items included in this gift box and also the customer service I received when I visited my local Bare Minerals counter. I can't wait to use more of their products and add to the collection!

Has anyone else used Bare Minerals? Are you a fan?

post signature

Monday 27 January 2014

FitFlop Giveaway!

Well done and congratulations to the winner Helen K who liked my Facebook page. 

I'm really pleased to announce this latest competition to you lovely readers. The popular and well established company FitFlop are kindly giving away a pair of their super comfy and stylish Fitflops! 


FitFlop was developed in 2007 to create comfy and stylish footwear, using 'microwobbleboard midsoles' which helps diffuse underfoot pressure which enables the footwear to be super comfortable to wear. Since the launch in 2007 over twenty million pairs have been sold!! 

Fitflop, now a household name have a wide range of footwear to appeal to just about anyone. From sandals to boots to ballerina's to sneakers and all in a variety of colours and fabrics. 

In this competition you could win a pair of the popular Super T Suede sneakers in black worth £75.00 in the size of your choice  via the Rafflecopter below. These versatile sneakers would be the perfect choice to take on holiday, have a walk in the country or just to pop to the shops in, above all these will offer comfort and style when worn. 


Entry is via the rafflecopter and all you have to do to win is complete the options below. T&C's: This competition is open to UK/US entries only please and the winner will be notified via email so please make sure you provide a valid email that is checked regularly. You will have 24 hours to claim the prize and then another will be chosen. 


Friday 24 January 2014

GlossyBox Review January 2014 - Back to Basics

A little bit later than anticipated the knock on the door came the other day with delivery of the latest Glossybox. I remember receiving my very first box last January and wondering I'd made the right decision in signing up. This month's box is 'back to basics', it's pretty much a look after your skin box really! I feel a little underwhelmed again with this box but with Valentine's around the corner I'm hoping they pull their finger out. 

The box itself has had a subtle but effective makeover, the box seems more sleek and pinker if that's possible and I adore the Glossybox satin ribbon that is now used to keep the contents secure. As always I think this box looks incredibly appealing and high end. 


What was included in this months box I hear you ask? 


I have mixed opinions of this box, I feel quite underwhelmed by it if I'm truthful. Although there are some ok items which I will undoubtedly use (other than the under eye patches) I am finding more and more that the products are not what I deem to be 'high end' beauty samples which is what originally enticed me to sign up. Initially,  I signed up to Glossybox thinking that each month I would be sent 'high end' beauty samples but it would appear that they don't market it this way anymore and on the website it states that in the box will be 5 beauty samples so I'm sure that it's been changed since I subscribed. 

I digress.....here are the contents: 

Anatomicals Puffy the Eye Bag Slayer Wake Up Under Eye Patches RRP £6.00 for 3 pack, 2 pack received in Glossybox): I'm not sure how I feel about these, I might give them a go. These are designed to make you look less like the walking dead and will reduce the appearance of fine lines, wrinkles and revitalize the eyes. I think these would be particularly useful if and when a hangover presents! 


Yu-Be Moisturising Skin Cream (RRP £13.50 for 33g received in Glossybox 2 x 3g tubes): I have never heard of this Japanese brand, this cream is designed to be used on skin or lips and will revamp and enrich the skin, it contains vitamin E, vitamin B12 and a high glycerine content. I quite like it, has a bit of odd smell, almost like grass but it feels very moisturising if not a little greasy. The tubes are quite small so I can't imagine them lasting that long but an ok product to be included. 


Balance Me Super Toning Body Wash (RRP £10.25 for 250ml, received in GlossyBox 50ml): This is probably my favourite item having heard alot of good things about the Balance Me range. A body wash is always a handy thing to receive and this smells lovely and lathers really well. Can be used as a shower gel or as a bubble bath and gives you a nice boost in the morning thanks to the blend of juniper, bergamont, geranium and lavender essential oils. 


Vaseline Essential Moisture Lotion (RRP £4.99 for 400ml, received in Glossybox 50ml): Come on Glossybox. Vaseline, really?! Now don't get me wrong I actually really like the Vaseline brand which I can pick up my local supermarket.....at any time!!! I know it's an iconic brand but I just don't think this sort of beauty sample is acceptable to be honest, maybe I'm being a little harsh but a more unique brand would have been more appreciated. This is my least favourite product to be included. 


The Vintage Cosmetic Company Floral Slanted Tweezers (£8.00 full size product received): These are cute and since I'm forever losing my tweezers I'm pleased to receive these, they are very cute, girly and good quality. These are my other favourite item in this months Glossybox. 


As usual the info card and glossy magazine are included which is a nice touch. 


So there we have the January Glossybox, I really did feel quite underwhelmed this month, I know they are probably not going to get it bang on each month but if I hadn't got this box free with my Glossydots I would be debating whether to cancel or not. However I give the benefit of doubt again and look on to the February box!!

I would as always be interested in hearing your thoughts on this months box and if you received anything different?

post signature

Thursday 23 January 2014

Enchanted Interiors Nursery Wall Stickers - Review

There comes a time when a child's nursery needs to be redecorated or spruced up. When I originally decorated Alfie's room I wanted it to be quite neutral and something that would last so we opted just to simply paint the walls and apply a border with teddies on it and accessorize with matching bedding. Recently I have been thinking that he might need something a bit more colourful and fun but with minimal effort to jazz it up a bit. 

Enchanted Interiors offer a perfect solution to this, beautiful and high quality fabric wall stickers in a variety of colourful designs solve this problem.

I chose the enchanted royal knights and dragons sticker set, what little boy doesn't like dragons and knights!! I thought it had just the right amount of fun and variety to make his room look great. As you can see in the picture below this is what is included in the sticker set and this is a suggestion of how they can be arranged on the wall but obviously they can be arranged as you like. 


On arrival the stickers came securely packaged in a large, extra strong tube, they were pristine when I unrolled them and I was over the moon with how beautiful and professional the stickers were, I thought Alfie's room is going to look fab once these are on the wall! 

So what is included? 

1 x Enchanted Tree 103cm Wide x 118cm High
1 x Castle 45cm Wide x 96cm High
1 x Knight 31cm Wide x 34cm High
1 x Horse 44cm Wide x 37cm High
1 x Rainbow 55cm Wide x 29cm High
1 x Sleeping Dragon 53cm Wide x 33cm High
1 x Standing Dragon 40xm Wide x 58cm High
2 x Flying Dragons
1 x Treasure Chest
6 x Coins
83 x Leaves
3 x Clouds
10 x Stars
7 x Rocks

As you can see from the list above you get sent alot of stickers (119 in total) in this scene so it's just a case of deciding how to arrange them on the wall.  The tree is on one whole sheet in sections for ease of sticking up and on the other sheets are various dragons, knights and other suitable additions to add to the scene. 


The colours are so vivid and the sizing of the included images are much bigger than anticipating really adding to the effect on the walls. 


The brilliant thing about these stickers is they are completely self - adhesive and can be removed and re-positioned should you wish to move them about or re-position if you're not happy with the original choice of location. 


I particularly love the rainbow and the patterned stars along with all the different dragons they are just fabulous. 


Overall, I have been so impressed with the quality of these stickers, they are some of the nicest nursery stickers that I have seen, they will make a little boy or girls room very special indeed and I'm certain that as Alfie gets older he is going to love them being in his room and making stories out of the creatures and scene that he can see in his room. 


You can purchase these wall stickers for £145.95 but as I said earlier in the post there are many varieties and other options that will suit varying budgets if you don't want to go for a full scene like this one. I can't recommend them highly enough. 


My only debate was what colour to paint the wall and how to arrange the stickers!!
post signature

* Please note I was kindly sent the stickers for free  for review purposes, all the views and opinions are that of my own.

Wednesday 22 January 2014

Nakd Snack bars - Review

Nakd bars are quite simply tasty and all natural snack bars. Available in a wide variety of delicious flavours these bars offer a treat without the guilty feelings after! The Nakd company pride themselves on providing wholesome and delicious alternatives with no added ingredients, what these bars are made of are literally just fruit, nuts and natural flavours. No added sugar or syrups are required, just simple ingredients.


Along with the natural flavours these bars are also gluten, wheat and dairy free meaning they can be enjoyed by many people. Some of the delicious flavours that can be chosen are cocoa orange, berry delight, rhubarb and custard and caffe mocha among other choices, there is something for everyone. 
I particularly liked the cashew cookie and cocoa orange bars, they satisfy sweet cravings but also fill that 'snacky' feeling that I sometimes get. Alfie is a massive fan too and would often demolish a bar within a few minutes!! I don't think they look very attractive when you unwrap them but that doesn't overly matter as they taste really nice and you know that they're a healthy treat rather than a bar of chocolate. Guilt free, marvellous!


Not only are the Nakd snack bars available but you can also purchase the Nakd crunch bars if you prefer something that is more like a cereal bar, these are also available in different varieties to appeal to a wider audience. You can purchase the bars in mixed cases by clicking on the links provided in this post for around £14.99 a case. Alternatively they are available in selected supermarkets.  

Has anyone tried the Nakd bars? Do you have a favourite flavour?
post signature
* Please note I was kindly sent a case of mixed bars for review purposes, all the thoughts and opinions are that of my own.

Tuesday 21 January 2014

Mary Berry's Velvet Chocolate Torte Recipe

OK, OK, OK I know what you're going to be thinking that this is a crazy recipe to feature in January, it's chocolatey and calorific....... BUT it's such a simple dessert that quick to make and is a sure fire way to impress guests at a dinner party as it's delicious. 

I originally made this to serve alongside Christmas Pudding so there was a bit of variety at the dinner table but it's very rich so would suggest if you want a smaller portion to half the recipe as it otherwise serves 10 people!

Recipe (Serves 10).

200g/7oz plain chocolate
100g/31/2 oz caster sugar
4 egg yolks
2 tbsp brandy or baileys
570ml/1 pint double cream

Method

1. Line a 20cm/8'' spring-form or loose bottomed tin with clingfilm and lightly oil the film.


2. Break the chocolate up into pieces and drop into a food processor. Blend for a few minutes until just a few pieces remain in otherwise powdery chocolate (see picture below). If you don't have a food processor you can grate the chocolate instead. 


3. Measure the caster sugar into a pan with 90ml/3 fl oz water and gently heat over a low heat until the sugar has dissolved, stir this occasionally. Turn the heat up and briskly boil for 3-4 minutes, or until it has become a thin syrup. 


4. Set the processor running and pour in the hot syrup through the funnel onto the chocolate so that it melts and becomes liquid. If required add a little more boiling water if there is still some unmelted chocolate. Add the egg yolks and process for a few seconds before adding the brandy or baileys. If you're not using a food processor you can just beat the ingredients together. 


5. In a separate bowl beat the cream to a soft consistency then fold in the chocolate mixture. 


6. Spread the mixture into the prepared tin and level off the top with the back of a spoon, cover with clingfilm and transfer to the freezer for a minimum of four hours to freeze.

7. To serve: Remove from freezer, transfer to plate and release from tin. Allow to soften slightly before serving, decorate with strawberries, raspberries, icing sugar etc. 


8. Enjoy!! 

Sorry that this is such a decadent pud but you must give it a try if you're a chocolate fan like me and like something that is simple to make but is tasty. I think a biscuit base to this might also be quite nice which is something I'm going to experiment with the in the future.
post signature

For more information you can click on the link to BBC Food.